Monday, November 17, 2014

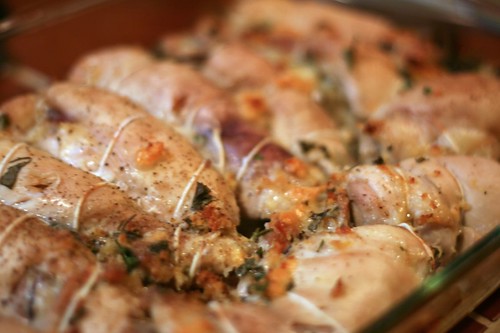
Baked Chicken and Vegetables

The title sounds so simple and there's a reason for that....IT IS SIMPLE.  This could quickly become a household favorite: for the chef and the eaters alike.  Baked chicken with vegetables dish is mostly about the prep; chopped vegetables, defrosted meat, and a preheated oven are key.  You can also switch up the vegetables based on your likes.  You could do things like sweet potatoes instead of potatoes and fennel instead of celery, or add things peppers and cauliflower.  The options are endless.

This dish can make a great one dish dinner.  Eating 1/3-a whole chicken thigh for your protein, 1-3 cups of vegetables, a few potatoes with natural carbohydrates  - means you will enjoy a delicious, satisfying - balanced meal.  And you have an hour and 20 minutes of down time :)


serving size 2-3
3 Tbsp olive oil
2 chicken thighs
2 beets
3 small potatoes
4 large carrots (6 small)
1/2 an onion
4 stalks of celery
3 cloves of garlic
salt & pepper

Directions:
1. Preheat oven to 325 degrees F.
2. Slice vegetables in equally sized pieces.  Set aside garlic cloves.
3. Drizzle about a tablespoon of olive oil on the bottom of a shallow baking dish.
4. Next, place the chicken in the middle of the pan.
5. Place vegetables in so that there are few over laps.
6. Crush garlic and spread on top of chicken vegetables.
7. Sprinkle 1/8-1/4 teaspoon of salt and 1/8 teaspoon of pepper over entire dish.  Then drizzle remaining 2 tablespoons of oil.
8.  Cover with foil and bake for 1 hour.  Then take foil off, raise oven heat to 375 and bake 20 minutes.
9.  Dinner is served.

Wednesday, November 5, 2014

Heavenly Sweet Potato Fries

...as the story suggested, our character made these baked fries for her family.  They were such a hit - ketchup was not even needed!

Sweet potato origin:  The sweet potato is thought to be from either Central or South America.  We do know that these tubers were domesticated at least 5000 years ago with additional theories that sweet potato remnants could be found in areas of Peru dating as far back as 8000 BC.

If you like tried and true food, this is one that is clearly a proven staple throughout human history.

OK get ready for the health benefits...

1. They are high in vitamin B6: B6 helps reduce a chemical in our bodies that has been linked with degenerative diseases, including heart attacks.

2. They are a good source of vitamin C: C is a well-known vitamin, know for warding off colds and flus.  But did you know it also aids in bone and tooth formation, digestion, and blood cell formation. Not to mention it produces collagen - which helps maintain your skin's youthful elasticity.

3. They contain vitamin D: D is again another popular vitamin know for its help with the immune system and plays an important role in our energy levels, moods...just to start.

4. Sweet potatoes contain iron: You need iron for energy but it as is important for white blood cell production, resistance to stress and proper immune function.  Again...this is just the beginning of this mineral's benefits.

5. These tubers pack magnesium: This mineral aids in relaxation and anti stress.  Bodily functions including healthy arteries, blood health, bone health, muscle strength, and nerve function are also improved by mag.

6. They are a source of potassium:  and important electrolyte that helps regulate your heartbeat and nerve signals.

7. Sweet potatoes contain carotenoids:  That orange color gives this away.  Most notably known for warding off cancer and protecting against aging.

                                
For other recipe ideas:     www.health.com/health/gallery/0,,20600272,00.html


EAT THEM!

Baked Sweet Potato Fries

5 sweet potatoes or yams
2 Tablespoons Olive Oil
Sprinkle of paprika, garlic powder, salt


Instructions

1.       Preheat oven to 400 degrees.
2.        Peel sweet potatoes and cut in long thin pieces, like French Fries.  Put all cut sweet potatoes in a large mixing bowl. 
3.       Pour olive oil over potatoes and mix until each piece is coated.
4.        Lay sweet potato pieces out on a baking sheet. 
5.       Sprinkle the spices lightly over sweet potatoes, covering each with a dusting of spice.
6.       Bake 15 minutes.
7.       Using a spatula, flip sweet potatoes.  Bottom side should be crunchy now.
8.       Bake another 15 minutes.
9.       Cool and serve.

Monday, October 27, 2014

Monday Night Fare

Working from home had its advantages.  Namely, she worked her own hours.  Sometimes early mornings, sometimes late afternoon.  Other times she'd worked in the evening.  One thing was for sure, when she was in a zone and accomplished her work, the next thing up would always be something the kitchen.

On this particular day she had done the early morning work routine.  Although it sometimes saddened her  bit to lack more professional opportunities at her disposable, she still completed her professional tasks with care and concern.  And then with the time her situation allowed her to be free, she decided to prep up a dinner to die for.  Well, not exactly.  But it would be delicious, nutritious, and might even look pretty.

The menu was set:
Juicy Baked Turkey Burgers
Tangy Sweet Potato Fries
Baked Potato Halves (b/c the others in her family loved)
...and finished with 
Broccoli and a Lemon/Oil Emulsion

Now at 1:30 in the afternoon there is only so much you can do to prepare for dinner.  She did exactly that.  A quick rinse of the fresh broccoli her mother had brought her from the CSA and she had it cut up and in the steamer.  She slyly noted the freshness of the broccoli as condensation bubbled from the truck as the knife exposed the flesh.  

Next up, potatoes.  The potatoes were a cinch and therefore, she'd make them for the potato lovers in her family.  She, however, was a sweet potato woman.  The potatoes were dressed lightly with olive oil, salt and pepper.  The sweet potatoes, however, took much more time, effort and energy.  After rinsing the large tubers, she sliced off four sides of each one, making the sweet potato flat on all four sides.  Then she proceeded to cut them, first in centimeter slices, then in long strips making them look like a French fry.  

The orange delights were put into a large mixing bowl topped with salt, pepper, fresh diced garlic and paprika.  She tossed the fries realizing she needed a bit more strength to get the job done.  This was something she learned through yoga, grounding her feet into the earth, she used her stability and core to power through the mixing of the sweet potatoes and spices.  She alternated with her non-dominate hand to double the challenge and get her other side interacting in this feat.  Finally she drizzled the olive oil, which made the mixing smoother to her delight.

Ground turkey.  Hrrrumph.  How would she make this something the three of them would enjoy? She thought a long time, googled turkey burgers to see the world wide web's takes on these lean patties. Eventually, she designed a plan for preparing the meat on her own.  She would mix the meat with a plethora of tasty ingredients and then make patties to bake.  The thought of some homemade guacamole to top her burgers seemed lovely.  An idea for later...

It was a nutritious dinner that even her child would enjoy.  Lots of flavors and colors and fabulousness.  To see recipes for each menu item, see following posts.

Wednesday, October 22, 2014

Quick Kale Soup

SCROLL DOWN FOR RECIPE OR ENJOY A PAGE OUT OF THIS STORY…..

Mid October was when she started dressing in layers.  The entrance of cold somehow bit her at the core and she was already striving for warmth even before the winter approached.  Having cleaned up and dressed in comfort, she decided to brew up a warm soup for her midday sustenance.  The kale had now been sitting in the refrigerator for over 2 weeks.  She couldn't bring herself to dispose of it. So precious in nutrients, born of the land, the kale must be eaten.

And that was that.  Into the kitchen she found herself preparing the raw vegetables that would encompass her soup di giorno (or du jour); Italian or French, whatever suits your fancy.  She started with dicing the onion just a quarter of a Vidalia and let that begin to sauté in some olive oil as she quickly washed the kale, massaged it, drained it and chopped it.  Next, 3 cloves of garlic were peeled for the press.  A last minute addition came as she opened the fridge and searched for any hot ideas: asparagus (out of season but something she was drawn to at the store- a longing).  

Into the onions after 3 minutes by themselves, she added the garlic and stirred.  Garlic is delicate and therefore she would only sauté it for 30 seconds.  The kale was ready and dumped in with enough oil from the beginning to cover the greens gently.  She tossed the vegetable mixture together then added a splash of Pinot Grigio and listened to the sizzle.  About a minute later the liquids were added with one part broth and three parts water.  Her friend had given her some Korean red mahtjang sauce (it is miso with Korean red pepper), which she added a few large spoons of and stirred into the liquidly, vegetable mixture.  She topped it off with a shake of sesame oil, soy sauce and a few dashes of salt.  There.  Lunch.  Yum she thought, although as she leaned over the bubbling brew to get a whiff, the scent was not enticing nor promising as it only smelled of raw kale.

At home in the kitchen, her easel, her medium, her art - she lowered the heat down to a light simmer, stirring once more and then covered.  She walked away with a sense that everything would come together in time.  And she was actually a little excited to see how it came out.  She let it cooked for 20 minutes.  

What she made was a masterpiece.

The smell had morphed into a deliciousness she couldn't explain.  The asparagus was tender and the kale was enlivened.  The golden brown sautéed onions added a sweetness to the taste.

Another lovely afternoon of caring for herself, practicing her art and making a concoction that was healthy and pleasant, extremely pleasant, to her palette. 


Quick Kale Soup
servings 2

2 T olive oil
1/4 sweet onion, diced
3 small garlic cloves
one bunch of kale
about 7 asparagus stalks
1 T white wine
1 cup broth
3 cups water
3 T red mahtjang (miso) sauce
1 t sesame oil
1 T soy sauce
1/4 t salt


1. Prep all vegetables first.  Chop onions, peel garlic, rinse and chop kale, rinse and snap asparagus. 

2. Warm oil in pot.  Add onions and sauté 3-4 minutes, until golden brown.  Crush in garlic and cook for 30 seconds.   Add kale and tossed to get all leaves lightly coated with oil.

3. Splash in white wine and cook for 1 minute.  Then add in all liquids.  Stir gently.

4.  Add in remaining ingredients, stir again, lower heat so that the soup is at a light simmer, cover and cook for 20 minutes.

5.  Enjoy!

Tuesday, September 2, 2014

Braciole


Its just another Wednesday evening.  Work went fine.  Pretty easy livin'.  The most daunting thought that lingers is simply what to have for dinner.  As a perfectionist in some striking ways, she relishes in the fantastical thoughts where she creates a masterpiece to serve each night.  And truth be told, mostly she does this with ease and enjoyment.  Still...none of this answers the question: what will she have for dinner tonight?


The chicken thighs were taken out of the fridge early that morning in anticipation of 'something' for dinner.  At around 6pm when she realized nourishment was going to be a necessity for herself and her family, a light bulb glowed above her head.  BRACIOLE (pronounced bra-sh-Ole) is an Italian American dish that originated from Sicily, Italy.  The concept is the same:  thin pieces of meat layered with a mixture of cheeses, spices, bread crumbs, prosciutto, pine nuts, well, whatever it is you fancy you can add in yourself.


So there it was: bracciole, that's what she would have for dinner.  Her childhood memories of bracciole are quite nostalgic and at the same time different from what she was about to embark on this evening.  And here she took a brief pause to remember the past.  Growing up, her family made braciole with beef and a light stuffing mixture of grating cheese, herbs and spices, and the few with raisins too.  They were rolled up, tied with thread, and cooked in the sauce.


Tonight's dinner is a twist on the old way...


BRACIOLE DI POLLO
serving size 6


1-1.5 pounds of chicken thighs, boneless
1 1/2 cups bread crumbs
1/4 cup grating cheese
1/4 cup cheddar cheese
1 t parsley
1/2 t oregano
1/2 t basil
1/4 t salt
dashes of pepper
2 cloves of garlic, crushed
2 eggs, beaten well
1/4 olive oil
1 c cooked spinach, chopped


1 lb. spaghetti, boiled as per package instructions, dash of salt added to water
2 cups tomato sauce


Directions:
To begin gently lay the thighs out and place them between two sheets of wax paper.  Then thin out.  She started by rolling with a rolling pin but when that proved challenging, she used the end of a rolling pin as a mallet and gently but with strength, thinned the chicken.  Lay on plate, set aside.


Mario Batali stuffed chicken legs braciole di pollo

Picture compliments of Mario Batali stuffed chicken legs braciole di pollo.
Cook the spinach and preheat the oven to 450.


Then to the mixture.  Its a stuffing, find your own flavor.  Here's what she did.  She mixed the bread crumbs with the finely grated cheeses.  Then the spices were added and the mixture tossed to blend well.  Next the crushed garlic and then the eggs.  She ended with a few heavy splashes of olive oil, for taste, moisture, health, and vitality!  Lastly the spinach was blended in well.


The mixture gets layered on top of each piece of chicken.  It should be about 1 cm deep and pushed in gently to create a unified bond to itself and the chicken.  She covered each piece of chicken with the mixture and then individually rolled each up, spiraling the chicken and the stuffing, creating a delectable union of tastes and a visually stimulating sacred spiral.  Each was tied with two pieces of twine, knotted for security.  A few pieces of chicken had broken off during the meat thinning debacle and now she used those strays to patch up areas on her braciole that needed covering.


A lightly oiled pan cooks these nicely.  They were laid in and then the extra mixture was used to top them.  This time a thin light stream of olive was dashed twice over of each braciole.


She baked them for 38 minutes.  Once in, the meal felt quite easy and was quickly unfolding into effortless success.  


 Last would be to boil pasta water and cook the spaghetti.


With a fire in the woodstove and her daughter next to her doing her school work, this woman could revel in more peacefaul, fulfilling moments of her life. She curled up in the papasson chair and jumped into her current love affair, a book she got for Christmas, The Marriage Plot by Jeffrey Eugenides.  Braciole, just the sound of it seems complicated and time consuming and wonderful all in one breath.  But alas, things aren't always what the seem.


The 20 minutes of reading, the quick dinner, it all seemed so perfect.


But wait...


Let's finish this recipe.


She let the chicken bracciole sit for a few minutes, then placed them on a plate and left the hot baking dish on the stove top.  She mixed the 2 cups of sauce into the pan to heat it up.  Then the spaghetti was thrown in and mixed.  Lastly the chicken braciole were sliced and laid on top of the spaghetti covering the dish with their sprials, and offering an image and contemplative idea about creation and growth, as spirals symbolize, and the comfort of food as the palate was revered and satisfied.


And the leftovers the next day....divine. In the end, another masterful meal was created as art.

Wednesday, August 27, 2014

Chocolate Covered Coconut Macaroons

How about making a fun treat for yourself?  If you like coconut, you should definitely try this out.  Living fully digging deeper http://www.taprootmag.com/ (The recipe was part of an article titled "Feeling Your Way Around the Kitchen" and that's exactly what you will do with this recipe.)  I found this experience, as I do many others that I'm mindful about, to be very meditative, as I used my hands to work the ingredients into something special.

The author's take in this article is that touching our food has countless advantages.  From learning theories that boast superiority through sensory learning (Waldorf and Montessori), to nerve ending relaxation, writer Cynthia Lair shares a few recipes that allow the chef to use his or her hands as processing tools.

I got excited about the macaroon recipe.  The pictures made them look so appetizing, the ingredients' list sparked my interest, and the idea of making something fun while getting my hands messy- well, it just seemed like I should dive into this adventure.

I did change the recipe up a smidgen and I'd like to share it here with you this Easter.  Here's a picture of my final product.  Yum!

Chocolate Covered Coconut Macaroons
makes 12

ingredients...
2 1/2 cups shredded coconut, unsweetened
1/2 cup honey
2 egg whites
1/2 teaspoon almond extract
1/2 teaspoon vanilla extract
4 oz dark baking chocolate
2 Tablespoons butter
1/4 cup sugar

directions...
1. Preheat oven to 300 degrees F.  Lightly grease cookie sheet.
2.  Lightly oil a measuring cup to measure honey.  Place sweetener in a pan on low heat.  Heat until honey thins.  Then add coconut and egg whites, stirring constantly.  Continue stirring and cooking on low heat for 2-3 minutes.
3. Remove from heat and stir in extracts.  Let cool.
4. With moist hands, make small balls the size of gold balls with the mixture.  Here's where you get your hands messy.  This process can be grueling if you are not attentive.  You will need to cup mixture tightly and pass it back and forth from one hand to the other.  This may take some time but making strong, adhesive balls, while only be a benefit to your final product.
5. Bake for 20 minutes.  Let cool.
6. Melt 3/4 of the chocolate in a double boiler.  Turn off heat and add last 1/4, plus butter and sugar.  Mix well until all melted and blended.
7.  Pour chocolate mixture over each macaroon.  Let sit at room temperature for 1 hour.  Then refrigerate.


To follow me, please type your email into the subscribers' box or you can email me at healingwithpeace@gmail.com

Monday, August 25, 2014

Honey Tofu Stir Fry

With summer on the way, vegetables will become more local and present.  CSA pickups will be loaded with lettuces, spinach, bok choy and and more.  But to get my family to eat these nutritious leafy greens, I have to add a hint of sweetness to the meal.  That’s why I decided to sneak a little honey into my family’s dinner diet.


Honey is a sweet food given to this earth by bees.  Honey bees produce honey through a process of regurgitation and evaporation.  The bees leave their hives in search of flower nectar and sweet deposits from plants and trees.  They gather, modify, and store the nectar they collect in the honeycomb.  As a collective the bees return to their hives and pass the nectar onto the worker bees.   The worker bees, after chewing the nectar to continue to break down the enzymes, eventually spread the nectar throughout the honeycombs.  This is where the evaporation happens and the nectar, over time, becomes a thick syrup.

Local honey is something everyone should incorporate into their diet.  Because bees in your area are collecting nectar that contains the pollen you are ingesting, your local honey is a natural way for your body to develop an immunity to the pollen and its allergens. 


With nature’s treat in mind and the abundance of veggies, I made a tofu stir fry sweetened with a honey sauce.  This dish is a real crowd pleaser and jam-packed with nutritional goodness.


Tofu Stir Fry w/ Honey Soy Sauce                                                                       serves 5 as main meal

INGREDIENTS   

2 T. olive oil (or sesame)                                                         ¼ t. turmeric
½ onion, sliced thinly                                                               ¾ t. ginger
½ red pepper, 1 inch strips                                                      3 T. HONEY
3 carrots, 1 inch strips                                                             1 head baby bok choy, chopped
3 cloves garlic, minced                                                           ½ lb. spinach leaves, chopped
1 T. rice wine vinegar                                                             1 cup broccoli, steamed, cut
¼ c. soy sauce                                                                       1 lb firm tofu
1/8 c. water                                                                           1 egg, scrambled
¼ t. cumin                                                                             1 package brown rice noodles, boiled 2 min


Instructions for meal creation:

1 – Preheat oven to 350. Cut tofu cube into approx. 8 slices ½ inch wide.  Lay slices in a lightly oiled baking dish and drizzle with soy sauce and honey (in addition to the amounts needed above).  Bake for 30 minutes.
2 – Meanwhile, use this time to do your prep work by preparing all of the vegetables.
3 – Scramble egg.  Put to side.
4 – Cook noodles.  Drain and toss with sesame oil.
5 – Begin meal completion.  Heat vegetable oil in large wok.  Start with sautéing onions, carrots, red peppers, and garlic.   Add rice vinegar, soy sauce and a bit of water. Toss well.
6 – Add honey, and veggies making sure to mix stir fry well.
7- Cut tofu into small cubes and add to stir fry.  Mix in scrambled eggs and noodles.  Coat all ingredients well.
8 – Serve and enjoy.

To follow me, please type your email into the subscribers' box or you can email me at healingwithpeace@gmail.com


Monday, June 23, 2014

Things aren't lost; they are misplaced.

Our days are so intense in the modern day with smart phones and emails and work and daily living, it's know wonder we seem to always be losing 'stuff': wallet, keys, the remote, a sweatshirt you know you have..

Imagine our ancestors’ lives, a bit simpler, perhaps slower, with less advancements in the ways of technology and communication.  To top if that, we have more stuff today then humans have had or processed in the past ever.

This is simply insight into the lifestyle we are currently enjoying.

Herein lies the reasons for our silly discombobulatedness .


Sometimes its simple, like, you can’t find your keys.  You start searching with a bit of panic.  You look in your coat, your purse, you sweep your eyes around the house and ..NO KEYS.  If we slow down our reaction….the keys are not in my sight.  And calm down our minds, we can be more clear about our intent to find them.  With intention, anything is possible.  With Reiki and distance Reiki, I can help you get to this slower pace.  If you lose something and are struggling to find it, contact me healingwithpeace@gmail.com and I may be able to help you location that missing item.

To follow me, please type your email into the subscribers' box or you can email me at healingwithpeace@gmail.com

Friday, June 13, 2014

Shades of Green with Sage Upon Summer

Healthy quinoa spaghetti in a butter sage sauce.


I've posted about sage before.  It was earlier in the year last time.  It's June ~ almost summer June and my sage is growing these beautiful smelling leaves.  Sage leaves are great for cooking with or drying and burning. Both offer benefits to your overall wellness. 

Our recipe today will feature SAGE.  One of my favorite meanings of this word is: a wise person.  And a wise choice of an added flavor.  Look up SAGE: it holds so many meanings.  As a plant, sage has been around and popular since ancient times.  Thought to ward off evil spirits, work as a local anesthetic, and increase a woman’s fertility, to name a few, this plant had its importance.  Its official name is Salvia officinalis, and while it goes by many names, I like the Greeks etymology, which is “island tea”. 

We often think of sage in fall when it so pleasantly appears in stuffings and such.  But for today, let’s think of sage as green, a reminder that Spring has blossomed and Summer is around the corner.  A blessing of the growth that is alive outside. In remembrance of my Spring trip to Italy, today’s dish is an adaptation of one of my first dishes from when I first lived in Siena, Italy.

I remember entering the trattoria, the family run restaurant, as a silly young American college student, being famished and knowing little to no Italian.  Partnered with my dear friend, Martha, we were seated in the small, quaint dining room – alone.  Apparently we hadn't figured out their meal timings yet but the happy family invited us in and served us right.  We had Ravioli with a Sage and Butter sauce; it was ridiculous.  I remember little thereafter since the owner introduced us 19 year olds to the drinking of an appertivo, vino di tavolo and digestivo (you can read more about these in my post about The Big Night) http://www.vitaaterra.com/2013/02/tri-colored-risotto-from-movie-big.html . 

Simply put – we were sloshed.

I’d like to re-do the Butter and Sage recipe to fit into my diet where I try to limit durum wheat pasta and high fatty foods, like butter.  We’ll use quinoa pasta and olive oil to make this simple, yet ultimately satisfying dish, just light enough to know Summer is upon us, with shades of green J.

Painting from Koehler's Medicinal Plants (1887)

Spaghetti w/ Fresh Sage Sauce                                                                                  serves 4
http://www.quinoa.net/127/index.html

INGREDIENTS


One box of Quinoa spaghetti
3 T. olive oil 
2 T. butter
8 fresh sage leaves
a splash of white wine                                       10 garlic shoots, diced
½ a lemon, juiced                                             1 lb. of asparagus, steamed and chunked
¼ c. pecorino-Romano
Salt and pepper to taste


Instructions:

1- Put a large pot of water on, to boil your spaghetti.  Cook as box directs.  Save some of the cooking water.

2-  On the stovetop, on a low heat, melt butter and heat olive oil.  (Mario Batali says cook until you see a “noisette” or golden brown color from the butter.  This is the butter’s thinnest liquid form.)

3- Now add the garlic shoots and the sage leaves (that have been cleaned if plucked from your garden) make sure they get fully coated and then splash in a little white wine and let it sizzle off.

4- Once the leaves are covered and the wine has sizzled for 1-2 minutes, remove from heat.  Then add lemon juice.  Whisk a bit to emulsify.

5- Return sauce to low heat.  Stir in the asparagus. Gently pour in the spaghetti and a little of that cooking water, very little (too much will make the sauce watery).  Add cheese.  Toss pasta in sauce to coat each piece.

6 – Serve and enjoy.


To follow me, please type your email into the subscribers' box or you can email me at healingwithpeace@gmail.com


Monday, June 9, 2014

Escapades with Garlic Scapes


I’m writing today’s piece (or shall I say peace) on the harvest experience of garlic scapes.  Garlic scapes feel rather newly introduced or featured in my diet and that of what I’ve experienced.  I’ve experienced them the past couple of years at local farmer’s markets.  I even made scape pesto a few years back when a neighbor gave me a bunch from his garden.  Yet, all in all, this flower and stem of the garlic plant seem less than highlighted in our culture’s culinary repertoire.

The scape, which is considered by some to be a delicacy, has the same flavor as garlic, just a little less intense.  It is similar to the asparagus and can be cooked up or eaten raw.  This summer here in Vermont was a plentiful asparagus season.  We had months of days when we were able to pick our asparagus before dinner.  I cooked up asparagus frittatas, spaghetti and asparagus with ham, and sometimes I just steam it and drizzle with a little olive oil.   But now that summer has rolled in, the asparagus are beginning to roll out.   Their spring peak has come to an end.  Well imagine our surprise and excitement when we (my daughter, Athena and I) realized that we had 200 garlic plants in our garden.  This was a project belonging to our former roommate; he had planted his garlic before he knew he was moving.  Today when Athena and I walked out to the garden, boy oh boy, it was prime garlic scape harvesting time.

We clipped the plants; you want to clip the scape before the first leaf of the plant.  The nice thing about this harvest is it is part of a larger picture or process.  Snipping the scape or the bud of the flower, sends more energy in the plant down to the bulb: the garlic!  Bonus: now you have a fresh green vegetable to eat!

With our bucket overflowing with garlic scapes, we pranced gayfully back to the house.  There is something so rewarding, so satisfying about harvesting food.  And we gave our thanks too!  We expressed gratitude for our former roommate – what am awesome thing to share with us.  I had decided on garlic scape pesto for dinner (the recipe follow this article) as a nice way to highlight the harvested bounty.  Next, I wanted to efficiently and successfully store this load of garlic scapes for use in the future.  Our first mission was to chop.

Athena was amazed by the multitude of vegetable.  Ever notice how a garlic scape has a whimsical way about it; its spiral stem leading to a heart shaped bud.  Well the aura of a scape is something to be appreciated.  We chopped scapes for the next 2 hours.  I’ve decided to store a few cups in the refrigerator; these are for cooking scapes in sautés.  I cannot wait to make my Scape Breakfast Frittata for breakfast tomorrow morning: a zesty combination of scapes sautéed in olive oil, 2-3 eggs lightly beaten and poured over the sauté.  Seasoned with salt and pepper and served with a cup of coffee.  Yum, high in protein, strong in flavor- it’s a great way to start a day.

I’ll store another few cups of chopped scapes in the freezer.  This way they can last longer while I’m working with all the fresh ones.  And lastly, I’m making a ton of garlic scape pesto, some of which we had for dinner tonight on farfalle or as Americans know as butterfly pasta.

Health Benefits
The garlic scape, an obvious part of the garlic plant, packs the same nutritional benefits as the bulb itself.  This means scapes provide: protein, vitamin B6, vitamin C, selenium and calcium and help prevent diseases like heart disease, high cholesterol, high blood pressure, and cancer.  Scapes are also known to boost your immune system and reduce inflammation.  This delicacy is usually only available for a short window of time in the summer (this year we’re talking mid to late June in Vermont).  Look for them at your local farmers’ markets or grocery stores.  Stock up on this seasonal veg and freeze what you don’t use so you have bounty to use throughout the next couple of months.


Garlic Scape Pesto

Servings: about 6 oz

Ingredients:
1 cup garlic scapes, chopped
1/3 cup walnuts
¾ cup olive oil
1 cup cooked, chopped spinach
½ cup grated Locatelli, percorino romano
½ tsp salt
Several dashes of pepper


Directions:

1. Add walnuts to the food processor and chop finely.  Next add scapes to walnuts in processor, and chop.
2. Gradually add olive oil and continue to process on chop.
3. Add spinach and process.
4. Add Locatelli, salt, pepper and gently process just to blend mixture. 
5. Taste and season to preference.
Serve 4 tablespoons of pesto with 1 lb. of pasta.
Additionally made pesto can be stored in the refrigerator in an airtight container for up to 1 month.


A Kale Affair to Remember


Have I told this story before?  The one about how I hated kale.  How kale and I had such adverse reactions that we couldn’t even try to form a relationship?  How the EAT MORE KALE bumper stickers actually made me cringe?  I smile to myself just thinking about that time from my -not so distant past-. Kale is dated back to the Middle Ages when it was the most eaten vegetable in Europe. Why then, had I felt so estranged and even turned off by it?

Kale was a big deal in Vermont while we were living there.  I had a nutritional educationalist come speak to my high school class one day.  She had them make kale smoothies.  I never heard the end of it.  Those teens were more than disappointed in their green shakes over something more common to a high school cooking class, like popcorn balls or no bake cookies.  But alas, my role as an educator was to facilitate their experiences (Oh but I wasn't in class that day; not interested in a kale smoothie).


I lived with my sister for a while and she used kale.  And it so seem so foreign and strange.  She made kale chips and I wouldn't even try them.  Imagine the role model I was for my daughter…

Then we returned to New Jersey, state of our upbringing, and I started working on farms to connect to the nature piece I need in my life.  While gleaning for Rolling Harvest Food Rescue, http://www.rollingharvest.org/, the founder and executive director, Cathy Snyder, encouraged me to end my hate with kale!  She challenged me to eat the baby kale we were picking at Gravity Hill Farm http://www.gravityhillfarm.com/ - RAW.  

You know, it was a beautiful summer day, the sun shining so bright and strong (we often needed water and rescue in the shade).  But the big beautiful sky was blue and we were all on a high with the idea of collecting free, organic, expensive vegetables, for people in need.  So I just did it.  While harvesting, I just ripped a kale leaf off, pushed it in  my mouth with all five fingers, and began to chew.  Then another leaf, and another leaf.  I was shocked.  For a split second, an out of body experience had me peering down on myself with a crooked eye, wondering when the hell did I turn into a glutinous kale eater! But then I returned to the moment and chewing and tasting and swallowing and bring another and chewing and tasting and swallowing and all throughout the matnra - enjoying. It tasted amazing, so tender. Why had I been so scared?

My relationship with kale was headed in a whole new direction.  I didn’t know it at the time.  My mom signed up for the CSA at Sandbrook Meadow Farm http://www.sandbrookmeadowfarm.com/.  And wouldn’t you know it but kale was one of our first arrivals.  I was leery about how kale would be used and let my mom take it with her share, leaving me and kale apart. 

OK so fast forward, mom’s making the kale, she’s making a soup, She’s saving me a portion.  Oh my Universe!  I love it.  I want it.  Next time we go to the CSA I ask mom to take 2 bunches of kale.  “Do you want to take one home?”, she asks me.  “No, no, no,” I am clear as I back away from the giant leafy green in front of me.  “But make me that soup please.”  Some might call this ‘The Tipping Point’.
From then on, kale is a part of my weekly diet.  I love it.  I cook it.  My family now loves it too.

Enjoy your Fall Equinox.  Make Kale and Sweet Potato Soup!  I did with all plants from either my backyard garden or the CSA farm.  100% organic and local.


Kale and Sweet Potato Soup                                                                        serves 4 as main meal

INGREDIENTS         
                          
1 med onion, diced                                                               12oz diced tomatoes
6 cloves of garlic, whole                                                       2 cups broth
¼ cup olive oil                                                                      2 cups water
1 bunch of kale                                                                     3 sweet potatoes diced
2 t salt                                                                                  1 can pinto beans (or Northern Italian beans)
some dashes of black pepper
2 T fresh basil                                                                                    
2 t. dried parsley                                                                             


Instructions for meal creation:

1 – Prep work: dice onions, peel garlic, wash and massage kale, then cut into 2 inch strips.

2 – Heat oil medium.  Add onions first for 3-5 minutes, stirring occasionally.  Press garlic in using a garlic press and stir it constant, as to not let the garlic burn.

3 – Add kale and basil and make sure they get mixed well with oil.  Then add in tomatoes and liquids.

4 – Cook for 5 minutes.  Once it is to a boil, add sweet potatoes.  Simmer on low for 30 minutes.

5 – As the soup cooks, taste it for seasoning.  Adjust seasoning as needed.

6 – Add pinto beans.

7- Mix in scrambled eggs and noodles.  Coat all ingredients well.

8 – Serve and enjoy.


Who Knew?
What's New and Beneficial About Kale
  • Kale can provide you with some special cholesterol-lowering benefits if you will cook it by steaming. The fiber-related components in kale do a better job of binding together with bile acids in your digestive tract when they've been steamed. When this binding process takes place, it's easier for bile acids to be excreted, and the result is a lowering of your cholesterol levels. Raw kale still has cholesterol-lowering ability—just not as much.
  • Kale's risk-lowering benefits for cancer have recently been extended to at least five different types of cancer. These types include cancer of the bladder, breast, colon, ovary, and prostate. Isothiocyanates (ITCs) made from glucosinolates in kale play a primary role in achieving these risk-lowering benefits.
  • Kale is now recognized as providing comprehensive support for the body's detoxification system. New research has shown that the ITCs made from kale's glucosinolates can help regulate detox at a genetic level.
  • Researchers can now identify over 45 different flavonoids in kale. With kaempferol and quercetin heading the list, kale's flavonoids combine both antioxidant and anti-inflammatory benefits in way that gives kale a leading dietary role with respect to avoidance of chronic inflammation and oxidative stress.


Monday, June 2, 2014

Tri Colored Risotto from the movie BIG NIGHT (1996)


Here we're honoring a delicious, healthy meal and a good movie to watch.  The movie that receives credit for my meal is…. THE BIG NIGHT.  A fabulous film from 1996 starring Tony Shalhoub, Stanley Tucci, Marc Anthony, Isabella Rossellini, Minnie Driver, and the list goes on and on.  The story here tells the tale of two Italian immigrant brothers from the region of Abruzzo who come to the Jersey Shore to open a restaurant.  I highly recommend seeing this drama that includes moments of romance, laughing aloud, to literally drooling over some of the dishes Primo and Secondo (the brothers) serve up.


Although there are many dishes highlighted in the movie, most famously the traditional Italian Timpano (The Mystic Italian Dome – a blog for another day), today I will share a recipe for Tri-Colored Risotto.  This was one of the primo piatti served on “The Big Night”.

A bit of Italian meal structure background:  In Italy, a proper meal starts with an aperitivo.  This is the opening to the meal and similar to what we know as an appetizer.  However, in Italy the aperitivo is a bit different.  It includes an alcoholic beverage such as, prosecco, spumante, or wine, and occasionally small amounts of foods are offered like, olives, cheeses, dips, and bread.  Some people prefer to start with an antipasto, which is a slightly heavier start to the meal.  The antipasto is typically cold and includes affettati, or sliced meats, including salumi, hams, dried sausages, formaggio, which are cheeses (most notable: mozzarella), vegetables, and cold salmon, just to name a few.

The primo piatto is the first course.  This is where we see our first hot food and is heavier than the antipasto, but still lighter than the second course.  The primo is a non-meat dish and examples include but are not limited to: risotto, pasta, soup, gnocchi, polenta, or lasagna.

Next comes the secondo piatto, traditionally the heartiest course of the evening.  This course is where you will enjoy different types of meats and fishes.  The secondo piatto is typically cooked in a delicious sauce that highlights the valuable meat.  A contorno, or a side dish, is usually served with the secondi piatti and consists of vegetables.  The contorno is never served on the same plate as the secondo!

Think it’s over yet?  Not even close.  The Italians really know how to eat and so…let us continue.  The insalata, or salad, will be served at this time if no contorno was ordered.  Next comes formaggio e frutta, a cheese and fruit course most typically dedicated to the local specialties of the region.

A meal would not be complete without the dolce – dessert.  Some famous Italian desserts include tiramisu, panna cotta, panettone, zeppole, cannoli, and again this list goes on and on.  Caffe, coffee, is often drank at the end of the meal and is different than American coffee; it lacks the milky component and in the evening a strong coffee such as an espresso is served.

Finally, the meal is complete with a digestivo.  The digestivo is also called ammazzacaffe because it is served after the coffee.  The digestive is a strong, but small, alcoholic beverage intended to ease digestion after such a long meal.  Examples you may taste are Grappa, Amaro, or Limoncello.

Now let’s get back on track and discover more about today’s recipe blog.  I've decided to make the Tri Colored Risotto.  Risotto is a type of Italian rice dish that is cooked with a broth to create a creamy consistency.  Most often the risotto includes butter, wine and onion and can be meat, fish, or vegetable-based.  It is the most common way of preparing rice in Italy and there is a reason why:  it is delicious.

Etymology of rice: the rice plant is an herbaceous in the family of Graminae and of Asian origin.  Its origin dates back to the 6th millennium BC.  With that being said, rice is an ancient staple and the Italians have figured out how perfect it.

                                                  
The 3 colors of the Italian flag
highlighted in this dish.


Tri Colored Rice                                                 serves 4
Ingredients
4 Tbs. butter

1 small white onion, finely chopped        
                                                                                                                      
2 Tbs. finely chopped preserved lemon rind, optional                         

1 c. arborio rice                         
                                                                                                                                                      
½ c. freshly grated Parmesan cheese                  
                                                                                                                 
salt &  white pepper

to make a green and red layer
basil pesto (or other green pesto)
red sauce (tomato, marinara, etc.)


Instructions                                                                                                                                                                         
Add 5 cups of water to a pot and bring to a boil. Reduce to a low simmer and keep on a low flame.

Melt 3 tablespoons of the butter in a heavy, deep-sided pan over medium-high heat.

Add onions and cook, stirring with a wooden spoon, until soft and translucent, ~3 minutes.

If using, stir in the preserved lemon rind.

Add rice and stir for a minute or two, until everything is well-coated with butter.

Add one ladle full of the simmering water to the rice, stirring almost constantly.

Once all of the liquid has absorbed, add another ladle full of water.

Continue this process until most of the water has been added, ~20 minutes.


Instructions Continued…                                                                                                                                             
Taste rice, it will be done when it is tender with a firm center.

Add the Parmesan and remaining butter and stir until melted and combined into creamy, starchy rice.

Taste and season with salt and pepper as needed.

To make tri-colored risotto (layered like the Italian flag or Bandiera)

Divide the rice into thirds. For the white (or bianco) layer, leave the rice as-is.

For the green layer, stir in about ¼-½ cup of basil pesto at the end. (see an earlier for my pesto recipe)

For the red layer, stir in enough red sauce to color it.

Layer on a platter and serve.


To follow me, please type your email into the subscribers' box or you can email me at healingwithpeace@gmail.com